ORC Week 3: DIY Abstract Art
- Veronica Sanders

- May 18, 2021
- 4 min read
Updated: Jul 9, 2023
Hack for expensive art

We've made it to week 3! We're in the full swing of things now and to keep the momentum, I'm going to have some fun! Last week, I got the paint roller going by touching up the walls and turning my door from a stark white to a stunning black! This week, I'm letting the creative juices flow by creating my own monochromatic art paintings. If you're a fan of Restoration Hardware's minimalistic, abstract paintings, but can't afford the pricey ticket, this DIY art hack will be perfect for you! Before you read any further, be sure to catch up on the previous week to see the progress of my Scandustrial Entry Makeover HERE then come back to join the fun.
*post contains affiliate links | click here for full disclosure*
PAINTING THE CANVAS
If you remember the before pictures from week one, then you should have seen the blank wall that the wall vent is on. I want to direct the attention away from the vent by pulling the eye up. To keep my Scandustrial aesthetic going, I'm pulling an element from the Scandinavian side of design by implementing monochromatic art. Then I'll be fusing it with Industrial design characteristics by framing it in brass (that part comes later). Before I began, I needed to find my muse, so I used a piece from my Ronnie & Co.curated collection of design faves as inspiration.

I love texture, so I want to create a similar piece (or two), but instead of painting directly on a plain flat canvas, I'm going to jooj it up a bit! Get your paint buckets and spackle ready, because it's time to get down and dirty! To prepare, you'll need a few supplies:
Canvas of any size (I chose 24x36)
Canvas drop cloth or tarp
Spackle
Paint Cup
Putty Knife
Wide flat paint brush
White acrylic paint (can use any kind, but acrylic dries faster)
Matte black or plain black acrylic paint
I like to shop for these items at my local craft store, more specifically Hobby Lobby or Michael's because they always have great deals.
First thing's first, I laid out the canvas drop cloth in a bright and contained area. I used my back porch because I get lots of sun (helps to dry the acrylic faster too). Making sure the drop cloth is clean of debris, I placed my canvas on top and went to work with the spackle. I used the medium sized putty knife to spread the spackle. You don't have to worry about covering every inch of the canvas as we'll be painting over that later. I used a generous amount to spread making sure to leave raised areas to provide the texture I'm looking for. This spackle bucket was enough to cover (3) 24x36 canvases. Sit and let dry a couple of hours or overnight if you prefer.
After the spackle has had time to dry, it's time to get to painting. I put on my froppiest outfit just in case I spilled paint all over myself. I first took the white acrylic paint and squirted the paint over the canvas. I'm reserving the paint cup for the black paint. Keep in mind that you may need at least 2 bottles for larger or multiple canvases. Then I took my flat paint brush to spread paint over the entire canvas. This is where you'll want to cover every inch. I want the background of the canvas to read as one color, but I don't mind having a bit of spackle show through. It just adds to the character of the painting! Then I repeated this for any additional canvases and allowed the paint another hour or two to dry completely.
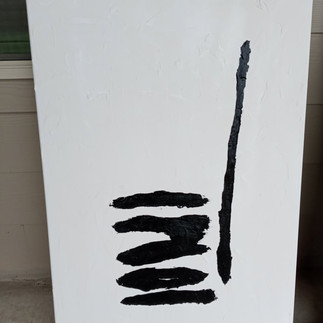
Now it's time to get creative. Once the white paint has had time to dry, pour the black paint in the paint cup to prepare for the next layer, the abstract black! You have the freedom to create any look you want with the paint. I just went with shapes that were a bit organic. This was a bit nerve wracking because I didn't want to mess up. The great thing is, it doesn't matter! If you do make a mistake, cover it with more spackle and start over. You can kind of see that's what I did with one of the canvases. I created coordinating pieces and one completely different piece as I plan to put that one over my fireplace mantle.
The black has been added and the pieces are finished. I must say, I'm quite happy with the results! I know one piece looks very dramatic, but it's exactly the effect I'm looking for. I want a conversation piece, a head turner. Like it or love it, it envokes thought and conversation. That's what I love about art.
LOOKING AHEAD
The next step is to get these babies framed, but it will take at least a week or two to get them back. I'll be updating with the finished look in a later week during the challenge, so don't forget to keep up with me and my progress. Now that the painting is done, I've got to move onto the next step. This is another fun part, LIGHTING! Those dainty light fixtures will be coming out and I'm planning to replace them with something much grander! You don't want to miss next week's post. Don't forget to catch up on the previous weeks' posts and follow along for updates on the other amazing projects during this week's ORC. Check them out by clicking on the image below. Until next week!
Can't get enough design? Feel free to snoop around my website and check out completed design projects. Our eDesign and 3D renders are also a huge hit! I specialize in curated spaces to help you live authentically you. If you have a burning design question that you could use some help with, I'm here for you! Our FREE discovery call is an opportunity for us to get to know each other and the perfect introduction to providing solutions.


Comments