

ORC Week 5: Scandustrial Entry Bench & Styling
- Jun 3, 2021
- 5 min read
Updated: Jul 9, 2023


Welcome to week 5! If you've been keeping up with me so far, you know that I've made some great strides with this space. This week, I'm kicking it up a notch by installing an entry bench and styling it. This bench serves two purposes: functionality and beauty. When I'm sourcing items for any project that I'm working on, my goal is for it to be aesthetically pleasing of course, but it MUST serve a purpose. No piece is incorporated in the space without there being a reason for it being there, so this bench will serve multiple purposes. Before I go into detail, make sure you catch up on the happenings by reading the past weeks' posts.
*post contains affiliate links | click here for full disclosure*
Now, let's get back to this entry way shall we! My entry is connected to a very long hallway, so I'm treating these two areas as basically one in the same. The archway separating these areas begins this expansive space that measures 16 1/2 ft long. See the image below as a quick reminder of what this hallways looks like with the updates I've made so far.


You'll notice in the photo on the left, there is a narrow niche centered in the hallway. The image on the right you'll notice there's an opening (to the left) that leads to another small hallway of a guest room and the garage, then this short wall has a wall vent and a door to my laundry room. I'm thinking of a few reasons why the niche wall makes the best location for the entry bench, here's why:
I try not to duplicate the same design, especially if the rooms are directly connected. I want to incorporate a console table somewhere in this space, but with the narrow, curved niche, I don't want to place a console in front of it. So this doesn't make it an ideal space for a console table for me.
The wall vent should remain free and clear of any obstructions (ignore the paintings sitting temporarily in front of it). The wall itself is roughly 7 1/2 ft. However, with only 5ft of hall width to work with, reducing it by cluttering it with tons of furnishings is not ideal for minimalistic style I'm going for.
Lastly, because the niche wall is so expansive, both vertically and horizontally, it makes the most sense for me to place a bench there. Especially since when we enter the home from the garage, our instinct is to head towards the right (the hallway). It's the perfect place for a quick sit down to pull off shoes and toss clothes into the laundry across.
The clear winner here is to place the bench beneath the niche. I know, you may be thinking, "Is this decision really that difficult to make? You could've put the bench anywhere!" True, but the key to great design is to curate the design based on the functionality of the space and how the user lives. If you always enter your home through the front door, the bench would be served best there. If you have guests that visit frequently, outside by the front porch may have been the better option. It's all in how you live, work, and play. These are things I keep in mind when designing any space for my clients.

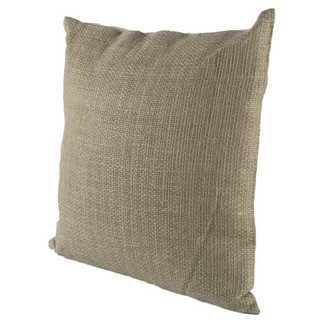
Given the wide niche, my goal was to find a bench that was nearly as long. It needed to be at least 60+ inches wide. The wider the better. However, given that we're in this COVID climate, I also wanted to make sure that it was in stock and ready to ship immediately! Luckily, I stumbled upon this beautiful piece and snatched it up before they ran out of stock. I love the modular, minimal style it has, but also the reclaimed wood industrial-esque flair. The dark wood tones will pair beautifully with the wall sconces and pendant lights. I snagged this sturdy Pablo Bench from Amazon.
Next step was for me to think about styling. I want this to be a comfortable, yet temporary sitting place. So I want to add pillows and a throw blanket. When you're looking for pillows, always double check the description to make sure it's a complete set. Some pillows already come pre-filled, and some are the covers only with the insert sold separately. Such is the case for the pillows I found. These linen pillows are from one of my favorite vendors, Mercana, and I purchased both the pillow covers and the down alternative inserts. These are the items are a designer exclusive and sold to the trade only, but if you're interested in any of these pieces, contact me and I'll help you order them! Here are the items I bought:


Now that I have the pieces I need, it was time for me to get to work assembling the bench. What I love about modular pieces is how easy it is to piece them together. A leg here, a couple of screws there and voila! It's assembled. Here's me putting in my blood sweat and tears assembling this easy peasy bench. I started by laying out the pieces as organization is always key in my design process. Then I assembled the legs one piece at a time making sure I had all the tools I needed and a solid, flat surface.


Now that all the pieces are assembled, it's time to style. This bench was a bit heavy (it's made of solid wood), so I had to have my son help me set it up. Once we placed it, I ripped my pillow cases from their packages (in excitement of course) and began stuffing them with the inserts. I love that these pillow cases have a hidden zipper. It helps to cover that unsightly hardware so the focus remains on the beauty of the finished piece.


Final step was to add the throw blanket. I placed this caddy corner in a slight angle for interest, but to also cover more of the bench. Now this piece is styled and ready to live free! That is until I get to the next phase which I'll discuss below. First, let's heart eyes these progress photos!


LOOKING AHEAD
The entry bench, though styled beautifully will have to move aside temporarily, because it's time to move on to the next big phase of this project. The niche! I got so busy I forgot to take photos, but I've scheduled my custom mirror vendor to come out to measure the nice. So next week, I'll be showing you the progress and reveal of the niche mirror! Plus, my art canvases have been framed and I can't wait to show you how they turned out. In order to catch those updates, you MUST check out next week's blog post and keep an eye on my social media for videos of the art reveal. You don't want to miss this! In the meantime, check in on the other One Room Challenge Guest Participant progress as well as what the Featured Designers have been up to. You can follow their updates by clicking on the image below. Until next week!
Can't get enough design? Feel free to snoop around my website and check out completed design projects. Our eDesign and 3D renders are also a huge hit! I specialize in curated spaces to help you live authentically you. If you have a burning design question that you could use some help with, I'm here for you! Our FREE discovery call is an opportunity for us to get to know each other and the perfect introduction to providing solutions.


Comments